How to Set Up eSIM?
Follow the steps below to download and activate your purchased eSIM on your device. Please select your device's operating system from the menu above.
Quick Setup
One-click automatic installation flow on supported iOS devices.
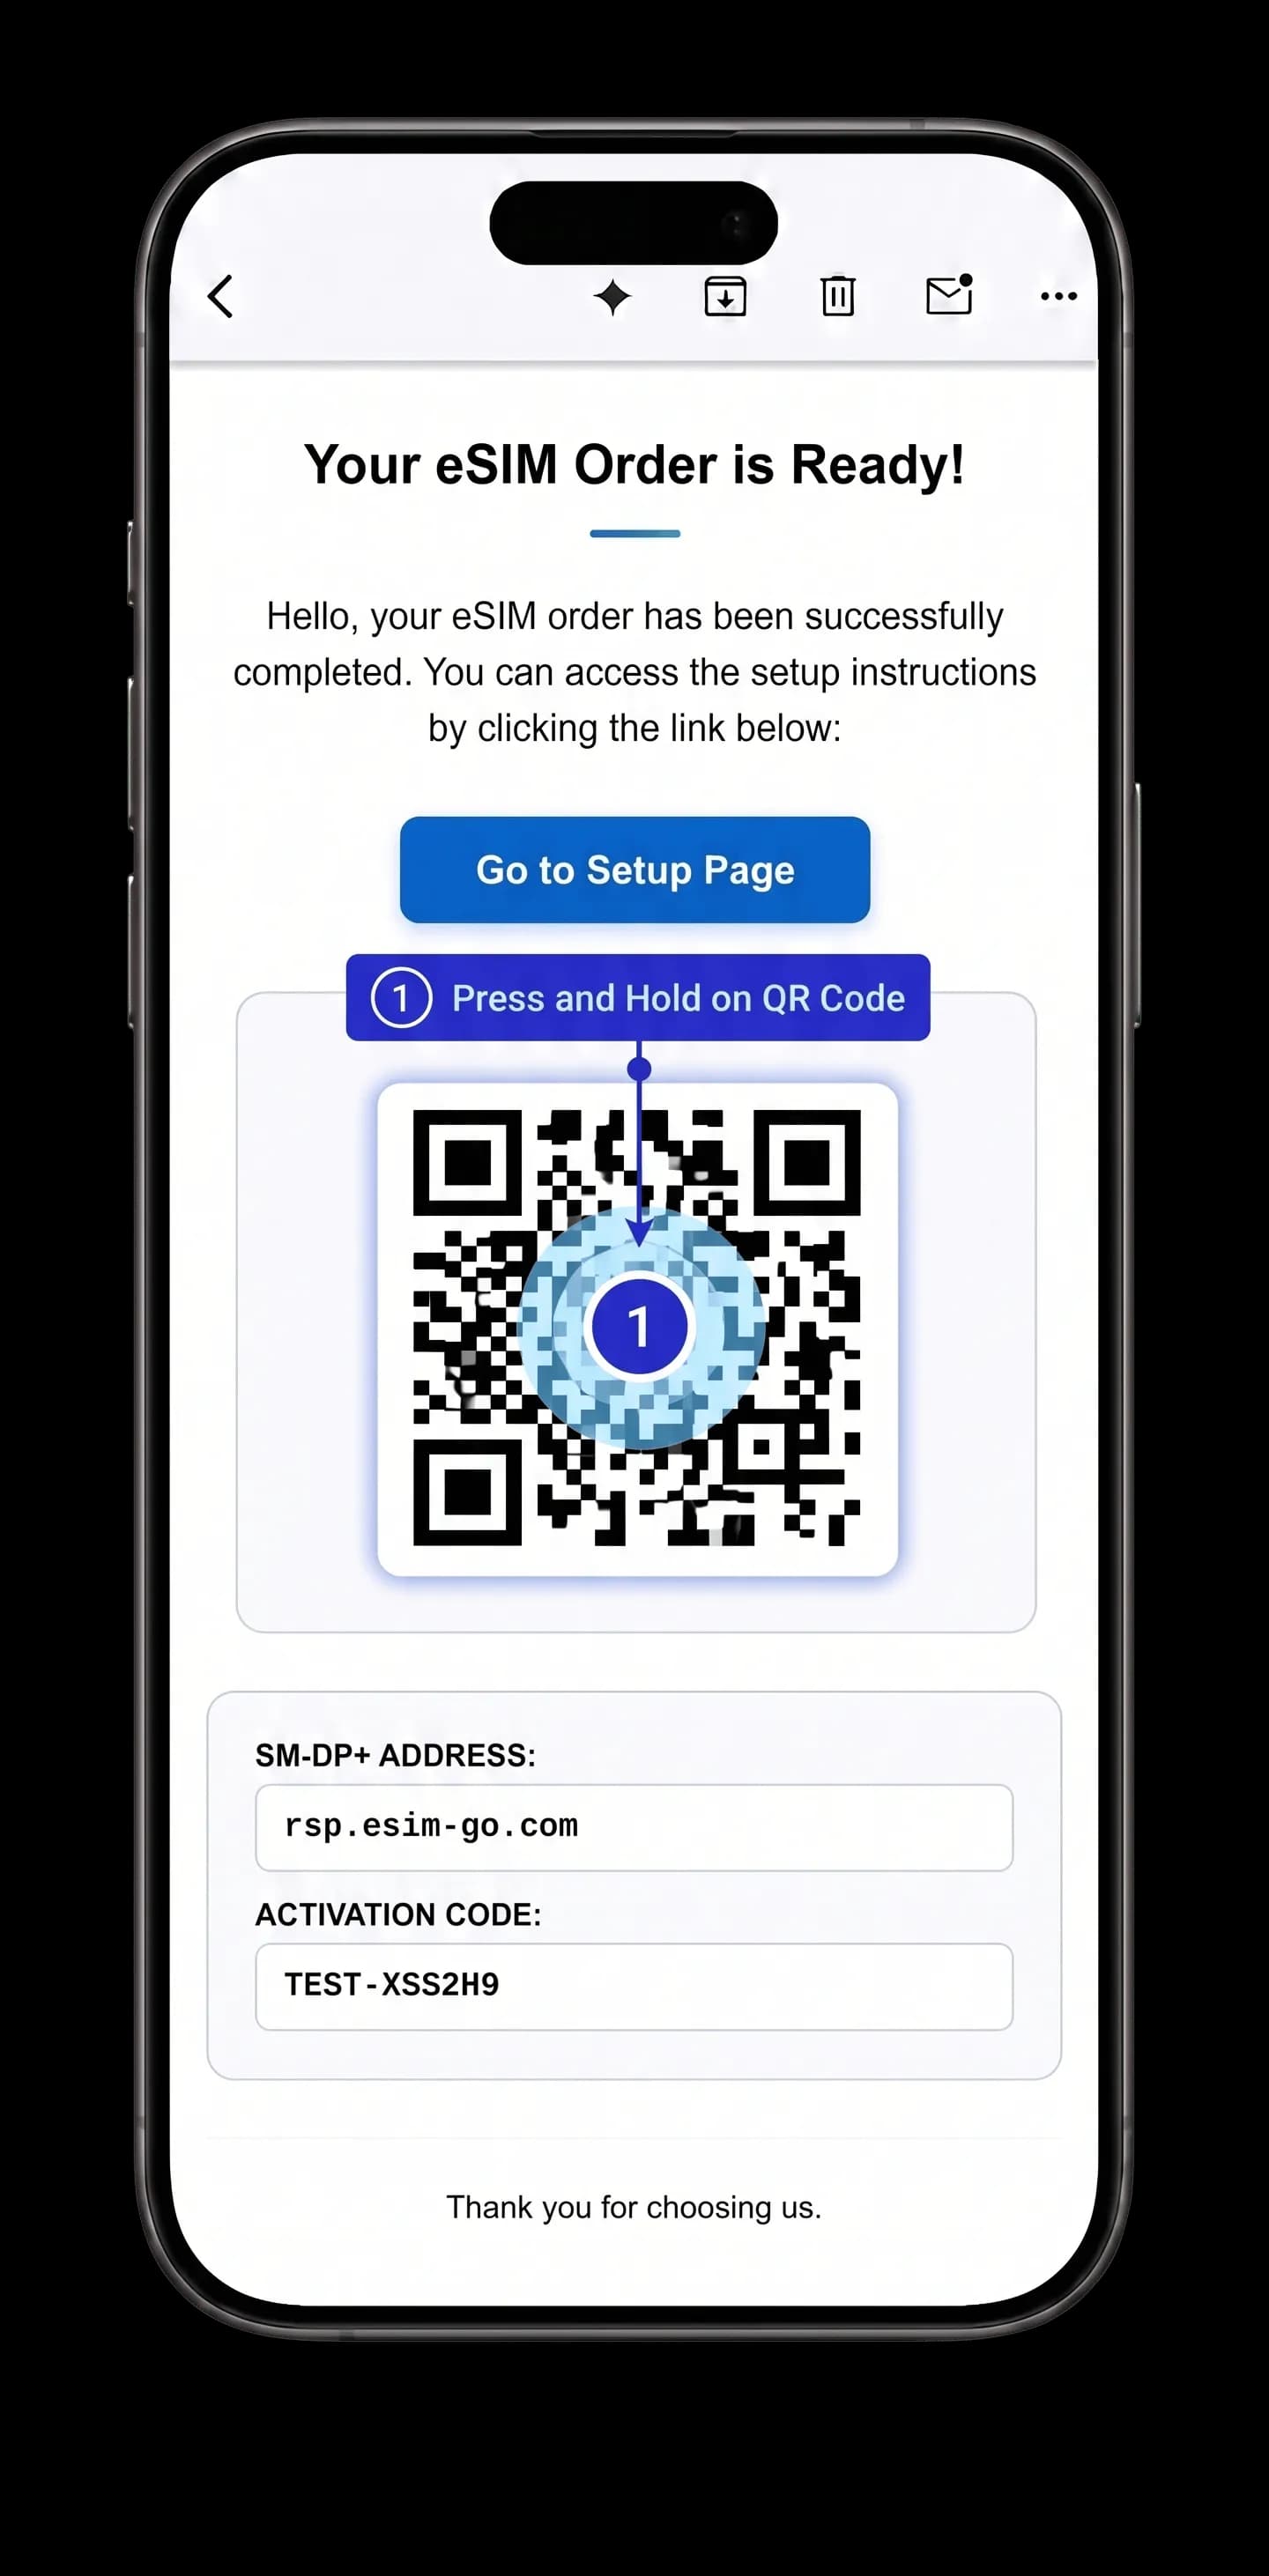
Press and Hold the QR Code
- Press and hold the QR code image sent to you.
- Select 'Add eSIM' from the popup menu.
Continue Setup
- Tap 'Add eSIM' again in the system popup.
Confirm Installation
- Tap 'Allow' in the warning box to confirm eSIM setup.
Starting Installation
- Your eSIM profile is downloading. Do not disconnect from the internet and wait.
Preparing for Activation
- eSIM is ready to activate.
- Tap 'Continue' to proceed.
eSIM Setup Completed
- eSIM has been successfully set up.
- Tap 'Done' to proceed to cellular label settings.
Plan Labels Setup
- Cellular plan labels page will open.
- Tap 'Continue' to proceed.
Determine Label
- Enter a label name of your choice (e.g., eSIMbag or Travel) for your new eSIM plan.
- Tap 'Continue'.
Select Cellular Plan
- Select the newly created eSIM label as the active data plan.
- Tap 'Continue' to proceed.
Finalizing Setup
- Tap 'Done' on the main settings page to confirm the final steps.
Configure Cellular Settings
- Go to Settings -> Cellular on your phone.
- ⚠️ WARNING: If you leave cellular data active on your primary line without completing this and the subsequent steps, your home operator may charge expensive international roaming rates!
Turn On Data Roaming
- Tap on 'Cellular Data'.
- Enable 'Data Roaming' for the eSIMbag line.
Setup Completed
- Select the plan labeled eSIMbag as the data source.
- Setup is complete, your internet is ready for use!
QR Code Setup
Quick setup by scanning the QR code sent to your email.
Open Cellular Settings
- Go to Settings -> Cellular on your phone.
Add eSIM
- Tap 'Add eSIM' in the menu.
Select QR Code
- Tap 'Use QR Code' on the screen.
Scan with Camera
- Scan the QR code sent to you with your phone camera.
- Setup will start automatically after scanning.
Starting Installation
- Your eSIM profile is downloading. Do not disconnect from the internet and wait.
Preparing for Activation
- eSIM is ready to activate.
- Tap 'Continue' to proceed.
eSIM Setup Completed
- eSIM has been successfully set up.
- Tap 'Done' to proceed to cellular label settings.
Plan Labels Setup
- Cellular plan labels page will open.
- Tap 'Continue' to proceed.
Determine Label
- Enter a label name of your choice (e.g., eSIMbag or Travel) for your new eSIM plan.
- Tap 'Continue'.
Select Cellular Plan
- Select the newly created eSIM label as the active data plan.
- Tap 'Continue' to proceed.
Finalizing Setup
- Tap 'Done' on the main settings page to confirm the final steps.
Configure Cellular Settings
- Go to Settings -> Cellular on your phone.
- ⚠️ WARNING: If you leave cellular data active on your primary line without completing this and the subsequent steps, your home operator may charge expensive international roaming rates!
Turn On Data Roaming
- Tap on 'Cellular Data'.
- Enable 'Data Roaming' for the eSIMbag line.
Setup Completed
- Select the plan labeled eSIMbag as the data source.
- Setup is complete, your internet is ready for use!
Manual Setup
Setup by entering the SM-DP+ Address and Activation Code manually.
Open Cellular Settings
- Go to Settings -> Cellular on your phone.
Add eSIM
- Tap 'Add eSIM' in the menu.
Select QR Code
- Tap 'Use QR Code' on the screen.
Enter Details Manually
- Tap 'Enter Details Manually' at the bottom of the screen.
Enter Activation Info
- Paste the SM-DP+ Address and Activation Code sent to your email into the corresponding fields.
- Proceed to the next step to start activation.
Starting Installation
- Your eSIM profile is downloading. Do not disconnect from the internet and wait.
Preparing for Activation
- eSIM is ready to activate.
- Tap 'Continue' to proceed.
eSIM Setup Completed
- eSIM has been successfully set up.
- Tap 'Done' to proceed to cellular label settings.
Plan Labels Setup
- Cellular plan labels page will open.
- Tap 'Continue' to proceed.
Determine Label
- Enter a label name of your choice (e.g., eSIMbag or Travel) for your new eSIM plan.
- Tap 'Continue'.
Select Cellular Plan
- Select the newly created eSIM label as the active data plan.
- Tap 'Continue' to proceed.
Finalizing Setup
- Tap 'Done' on the main settings page to confirm the final steps.
Configure Cellular Settings
- Go to Settings -> Cellular on your phone.
- ⚠️ WARNING: If you leave cellular data active on your primary line without completing this and the subsequent steps, your home operator may charge expensive international roaming rates!
Turn On Data Roaming
- Tap on 'Cellular Data'.
- Enable 'Data Roaming' for the eSIMbag line.
Setup Completed
- Select the plan labeled eSIMbag as the data source.
- Setup is complete, your internet is ready for use!
How do I add the eSIM to my phone?
You can follow the steps by choosing one of the methods at the top of the page: Quick Setup, QR Code Setup, or Manual Setup:
• Quick Setup: Press and hold the QR code to install directly.
• QR Code: Scan the QR code sent to your email with your device's camera.
• Manual: Copy the activation credentials and paste them into the corresponding fields in settings.
How do I select the installed eSIM as my active data line?
To route your internet connection through eSIMbag, follow these steps:
• iPhone: Go to Settings > Cellular > Cellular Data and select the newly added eSIMbag plan.
• Android: Go to Settings > Connections > SIM Manager and set Mobile Data to the eSIMbag line.
How do I turn on data roaming for my eSIM?
You must enable data roaming to connect to the internet while abroad:
• iPhone: Go to Settings > Cellular, tap your added eSIMbag plan, and turn on "Data Roaming".
• Android: Go to Settings > Connections > Mobile Networks and enable "Data Roaming".
When should I install my eSIM?
We recommend performing the installation before departure (while at home or connected to airport Wi-Fi):
• Before Travel: Install the profile in advance, but keep the eSIM line and data roaming disabled until you arrive at your destination.
• After Travel: There is no need to delete the eSIM. Simply turn off the eSIM line in settings and re-enable your primary SIM.
How long do I have to install my purchased eSIM, is there a time limit?
There is no need to rush to install your eSIM after purchasing it:
• Validity Period: Your package is valid for 12 months from the date of purchase.
• Installation Window: You can install and configure it at any time within this 12-month period.
• Expiration: If not installed or activated, the package will automatically expire at the end of the 12 months.
I installed my eSIM on my phone but haven't gone abroad yet, has my data plan already started counting down?
No, installing the eSIM (loading the profile) does not start your package usage:
• Package Start: Your plan's duration begins only when your phone connects to a supported local network abroad with data roaming enabled.
• Pre-travel Installation: You can install the eSIM before your trip with peace of mind, and simply enable data roaming once you reach your destination.
• Note for iPhone Users: In weak Wi-Fi conditions, the "Wi-Fi Assist" feature may occasionally use a small amount of cellular data and trigger the package early. To prevent this, you can disable it under Settings > Cellular before traveling.
I completed the installation but cannot connect to the internet. What should I do?
If you experience connection issues, please verify the following:
• Make sure the eSIM line is turned on in your device settings.
• Ensure "Data Roaming" is enabled for the eSIM line.
• Check that eSIMbag is selected as your active Cellular Data source.
• Verify that you have an active package for the country and are connected to a supported local network.
• If the issue persists, restart your device or toggle airplane mode on and off.
Can I install the same eSIM on multiple phones?
No. Due to security standards, an eSIM profile can only be downloaded and installed on a single device. If you wish to move the eSIM to a different phone, you must delete it from the current device first and contact our support team to request a new QR code.
What should I do if I cannot scan the QR code during setup?
If you have trouble scanning the QR code, you can complete the setup manually. Go to Settings > Cellular > Add eSIM, select 'Use QR Code', and tap 'Enter Details Manually' at the bottom of the screen. Copy and paste the SM-DP+ Address and Activation Code sent to your email into the required fields.
How to Set Up eSIM?
Follow the steps below to download and activate your purchased eSIM on your device. Please select your device's operating system from the menu above.